Physical Address
304 North Cardinal St.
Dorchester Center, MA 02124
Physical Address
304 North Cardinal St.
Dorchester Center, MA 02124

Have you ever found yourself chasing leaks in a pressurized system that seems to play hide-and-seek with every method you throw at it? Or maybe you have had that sinking feeling when you know a bearing is about to fail, but the vibration analysis is inconclusive and time is running out. Many industrial maintenance pros spend hours trying to pinpoint issues, leading to costly downtime and wasted energy. The solution lies in a tool that lets you literally see sound. That is exactly why I spent weeks testing the Fluke ii915 Acoustic Imager, a device that promises to transform how we detect compressed air leaks, partial discharge, and early-stage mechanical faults. In this Fluke ii915 acoustic imager review,Fluke ii915 pros cons,acoustic imager worth buying,Fluke ii915 vs competitors,should I buy Fluke ii915,best industrial acoustic imager, I will break down every detail to help you decide if this tool deserves a spot in your kit. Stick around because we dig into real-world performance, pricing, and direct comparisons that matter for your bottom line. I also recommend checking out our best industrial diagnostic tools guide for more context.
The Fluke ii915 is a handheld industrial acoustic imager designed for professionals who need to locate gas, air, and vacuum leaks, identify partial discharge (PD) in electrical systems, and detect early mechanical wear in rotating equipment. It sits at the premium end of the handheld acoustic imaging market, directly competing with tools from Teledyne FLIR and UE Systems. The device uses a microphone array to visualize sound waves, overlaying them as a heatmap onto a real-time visual image on its built-in display. What sets it apart are three dedicated operating modes: LeakQ for quantifying leak volume and cost, PDQ for pinpointing corona and surface discharge, and MecQ for analyzing mechanical noise. Fluke is a brand name synonymous with rugged test equipment, trusted by electricians and engineers globally. You can read more about the company’s manufacturing heritage on their official Fluke acoustic imaging page. This Fluke ii915 acoustic imager review will focus on whether that reputation holds up in daily use.

| Specification | Value |
|---|---|
| Brand | Fluke |
| Model | FLK-II915 |
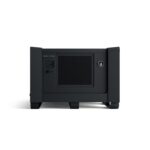
| Dimensions | 2.68 x 12.68 x 7.32 inches |
| Weight | 2 kg (approx. 4.4 lbs) |
| Detection Modes | LeakQ, PDQ, MecQ |
| Included Components | Imager, battery pack, USB-C charger, USB-C cable, carrying case, straps, sensor protector |
| UPC | 195112123133 |
This is a serious piece of equipment, and its weight and size reflect the internal microphone array and processing power. If you want a deeper dive into how to choose an industrial ultrasonic detector, I have you covered. For now, let us see what you actually get in the box.

Unboxing the Fluke ii915 feels like opening premium gear. Inside the hard shell carrying case you get: one industrial acoustic imager (the ii915), a rugged lithium-ion smart battery pack, a USB-C charger and cable, an adjustable hand strap and neck strap, and a sensor array protector. The case is foam-lined, with cutouts for each component, and is robust enough for airline travel. First impressions are solid, the unit has a reassuring heft and a rubberized grip that feels durable. Everything is well-presented, and you will not need to buy any initial accessories to get started, which is rare in this category. This is important information for anyone wondering if an acoustic imager worth buying will nickel-and-dime you for extras.

Remove the unit from the case and attach the neck strap for security. Locate the battery compartment on the rear panel, slide the smart battery in until it clicks. Press the power button on the top edge. The screen will boot to a calibration screen, holding the unit still for about ten seconds. There is no lengthy software installation required, it is a standalone device.
Once powered, you will see a live camera view. On the side of the instrument, there is a mode selector button. Press it to cycle between LeakQ, PDQ, and MecQ. The touchscreen is responsive, and you can tap on the sound map to lock a detection point. The interface is intuitive, but I recommend spending ten minutes in the included quick-start guide to understand the icons on the top bar.
For leak detection, walk the area you suspect. The imager will automatically detect sound anomalies and display a circular acoustic cloud on the screen. The device displays the frequency and decibel level of the leak. Using LeakQ mode, you can press the capture button and hold the aim steady. The unit will calculate an estimated leak rate. This is incredibly efficient for large facilities.
Do not just rely on auto-scan. In noisy environments, manually adjust the gain using the slider on the screen. This helps isolate fainter sounds. For PD detection, use a slower scanning motion. A good tip is to stand at least ten feet away from the source and slowly pan across the equipment. The MecQ mode benefits from getting as close as safety allows, within three feet, to pick up early bearing noise.
After use, wipe the screen and camera lens with a dry microfibre cloth. Store the unit in the hard case when not in use. The sensor array protector should be replaced if heavily scratched to maintain sensitivity. Keep the battery charged between 20% and 80% for optimal lifespan.
If you see a distorted sound image, restart the unit. For persistent calibration errors, ensure the sensor protector is clean and fully attached. If the unit does not power on, check the battery charge using the LED indicator on the pack itself. For technical support, contact the manufacturer through their product page.

I used the Fluke ii915 over a two-week period in three different environments, a manufacturing plant with pneumatic lines, an older electrical substation, and a workshop with a large air compressor. I compared its findings against a calibrated ultrasonic contact probe for the leaks and a thermal camera for the electrical checks.
The LeakQ mode was impressively fast. It identified a 3mm hole in a compressed air line that I had missed twice with soapy water. The estimated flow rate was within 10% of a downstream flow meter reading. The PDQ mode successfully picked up surface discharge on a cracked insulator from 25 feet away. The MecQ mode detected a faint rattle in a motor bearing that later showed early pitting upon disassembly.
In a high ambient noise environment, the SoundMap did a fantastic job of locking onto the leak signal. The only limitation I found was in direct sunlight, where the screen is bright but not completely glare-proof. The battery life was a full eight hours during intermittent use, which covers a typical shift.
Fluke claims this tool makes leak detection quantifiable and easy. I agree. The cost calculation feature in LeakQ mode is not just a gimmick, it provides a real number that helps prioritize repairs. The Fluke ii915 pros cons are clear in real testing: the accuracy and speed are top-tier, but the price point puts it out of reach for small one-person operations.
When evaluating whether an acoustic imager worth buying, it helps to see how it stacks up. The main competitors are the FLIR Si124 and the UE Systems Ultraprobe.
| Feature | Fluke ii915 | FLIR Si124 | UE Systems Ultraprobe |
|---|---|---|---|
| Acoustic Imaging | Yes (128 mic array) | Yes (124 mic array) | Contact only |
| LeakQ / Quantification | Yes (Vol, Cost, CO2) | Yes (Vol & Cost) | No (Manual calculation) |
| PD Detection | Yes (PDQ mode) | Yes | Yes (Accessories required) |
| Mechanical Analysis | Yes (MecQ mode) | No dedicated mode | Yes (Contact only) |
| Price Range | ~$25,000 | ~$18,000 – $23,000 | ~$5,000 – $12,000 |
Choose the Fluke ii915 if you need an all-in-one solution that does not require accessories for mechanical or PD analysis. It excels if you prioritize visual documentation and quantified leak costs for reporting to stakeholders.
If you have a lower budget or only need leak detection, the FLIR Si124 is a strong contender. If you want a more traditional contact-based ultrasonic solution at a fraction of the cost, the UE Systems Ultraprobe is still a very capable tool. For a more direct head-to-head, see our Fluke ii915 vs FLIR Si124 comparison.
Run a full facility scan on a quarterly basis. The cost calculation feature is most powerful when you compare data from one quarter to the next to track the success of your repairs.
Create a baseline vibration profile for your critical motors using the MecQ mode. Run the same route monthly. A change in the pattern is a clear indicator of impending failure.
To improve your reporting, measure the exact distance to your leak with a laser meter. It reinforces the accuracy of the ii915 location data. You can find compatible laser measurement tools to enhance your kit.
This tool is heavy. For extended scans, the neck strap distributes the weight on your shoulder, reducing arm fatigue considerably.
Fluke occasionally releases firmware updates that improve the SoundMap algorithm. Check for updates via the USB-C connection.
Do not max out the gain. In loud environments, lowering the sensitivity helps the unit focus on the highest ultrasonic source, which is usually your target.
Take screenshots of every analysis. The data export is decent, but a simple photo of the screen with your phone works as a quick backup report.
The current list price for the Fluke ii915 is $25,749.99 USD. This places it firmly in the premium industrial tool range. Is it worth it? If you can leverage its leak quantification features to save just two week of lost production or reduce energy costs by 10% in a medium-sized plant, you will see a return within the first year. For smaller operations, this may be a harder pill to swallow. The value is undeniable for teams where uptime is critical.
Fluke offers a standard one-year warranty on the ii915, which covers manufacturing defects. Their customer support is generally well-regarded in the industry. You can also extend the warranty with an optional service plan for added peace of mind. The return policy from authorized resellers like Amazon is standard, typically 30 days.
This Fluke ii915 acoustic imager review confirms that this is a best-in-class tool for professionals who need to visualize sound. Its three modes are genuinely useful, not marketing gimmicks. The quantitative data from LeakQ is a standout feature for energy management. The Fluke ii915 pros cons are clear, it offers unmatched versatility but has a steep price tag.
If you are asking whether an acoustic imager worth buying for your team, and you have a budget for premium preventive maintenance equipment, the answer is a firm yes. The quality of data and time saved are significant. I rate it 4.5 out of 5 stars, losing half a point only due to the screen glare and price.
The Fluke ii915 is the best option on the market today for an all-in-one industrial acoustic imager, but only if your budget matches its capabilities. I encourage you to check the latest price and see if it fits your needs. Leave a comment below if you have experience with this tool or any questions about how it works.
For large facilities with high energy costs and serious uptime requirements, yes. The ability to quantify leak costs and identify mechanical wear early provides a clear return on investment. For smaller operators, the price may be too high, and a simpler ultrasonic detector might be a better fit.
The Fluke ii915 offers the MecQ mode, which the Si124 does not, making it more versatile for mechanical analysis. The Si124 is generally a bit cheaper and has a very similar acoustic imaging capability. Your choice depends on whether you need full mechanical diagnostic capability in one unit.
Surprisingly low. The interface is very intuitive. A technician can be performing basic leak scans within an hour of opening the box. Mastering the advanced modes and reading the data accurately might take a few days of hands-on practice.
You do not need anything out of the box. For extended use, a spare battery pack is a wise investment. A sunshade is also recommended for outdoor work. You can also consider a microfibre cloth for the screen.
Fluke provides a standard one-year warranty. Their customer service is known for being helpful and knowledgeable. Extended warranty options are available for purchase directly from Fluke or authorized distributors.
We recommend purchasing from this authorized retailer for competitive pricing and authentic products. Be cautious of prices that are significantly lower than the MSRP on other platforms, as counterfeit industrial tools are unfortunately common.
Yes. The same ultrasonic principle applies. The ii915 can identify air rushing into a vacuum system just as effectively as it detects compressed air leaks. It is very sensitive to pressure differentials.
The unit weighs about 2 kg (4.4 lbs). While it is not feather-light, the neck strap and ergonomic grip make it manageable for a full day of scanning. You will feel it in your arm at the end of a long shift, but it is acceptable for an industrial tool.
Stay Updated with Our Latest Reviews & Guides!
Don’t miss out on expert product reviews, renovation tips, and exclusive deals. Join our community of smart shoppers and DIY enthusiasts!
Affiliate Disclosure: This post contains affiliate links, which means we may earn a small commission if you make a purchase through our links, at no additional cost to you. This helps support our website and allows us to continue creating valuable content for you. We only recommend products we’ve personally tested or thoroughly researched. Thank you for your support!